Authentication
This blueprint provides a comprehensive guide on setting up and understanding the enterprise-grade authentication system scaffolded by the generator.
Whether you're using standard email/password or Social Login (Google/GitHub), this guide covers everything from environment configuration to advanced security features like token rotation and theft detection.
Configuration
Authentication is driven by environment variables in your .env file.
# Core JWT Config
JWT_SECRET=your_super_secret_key          # Used to sign Access Tokens
JWT_REFRESH_SECRET=your_refresh_secret    # Used to sign Refresh Tokens
JWT_EXPIRES_IN=15m                        # Access token TTL (short-lived)
JWT_REFRESH_EXPIRES_IN=7d                 # Refresh token TTL (long-lived)

# Social Login (Optional)
GOOGLE_CLIENT_ID=your_id
GOOGLE_CLIENT_SECRET=your_secret
# Use /auth for MVC projects, /api/auth for others
GOOGLE_CALLBACK_URL=http://localhost:3000/auth/google/callback

GITHUB_CLIENT_ID=your_id
GITHUB_CLIENT_SECRET=your_secret
GITHUB_CALLBACK_URL=http://localhost:3000/auth/github/callback
Standard Auth Flow (Email/Password)
Our standard flow follows industry best practices: Stateless Access Tokens paired with Persistent Refresh Tokens.
1. User Registration (Signup)
Users can register by sending their name, email, and password. The system automatically hashes the password using bcryptjs before storage.
POST /api/users
{
  "name": "Jane Doe",
  "email": "jane@example.com",
  "password": "securepassword123"
}mutation {
createUser(name: "Jane Doe", email: "jane@example.com", password: "securepassword123") {
id
email
}
}2. User Login
Upon successful login, the server returns an accessToken and a refreshToken.
POST /api/auth/login
{
  "email": "jane@example.com",
  "password": "securepassword123"
}
What happens next?
- Client-Side: Store the
accessTokenin memory (or a secure state) and therefreshTokenin a secure, HttpOnly cookie (default for MVC) or secure storage (API). - Authorization: Include the token in subsequent requests:
Authorization: Bearer <accessToken>.
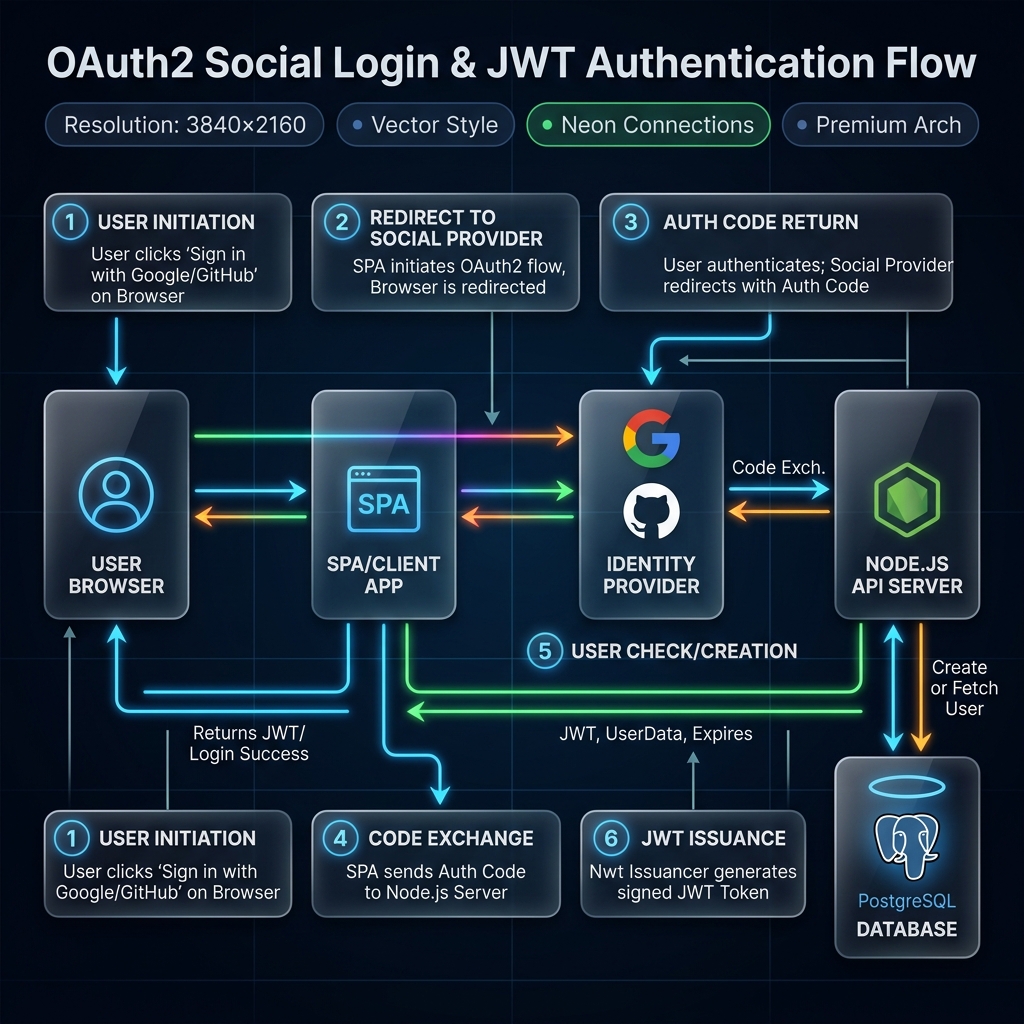
Social Login Integration
The generator supports a "Pluggable Social Auth" system that adapts to your architecture (MVC, SPA, or Mobile).
How it Works
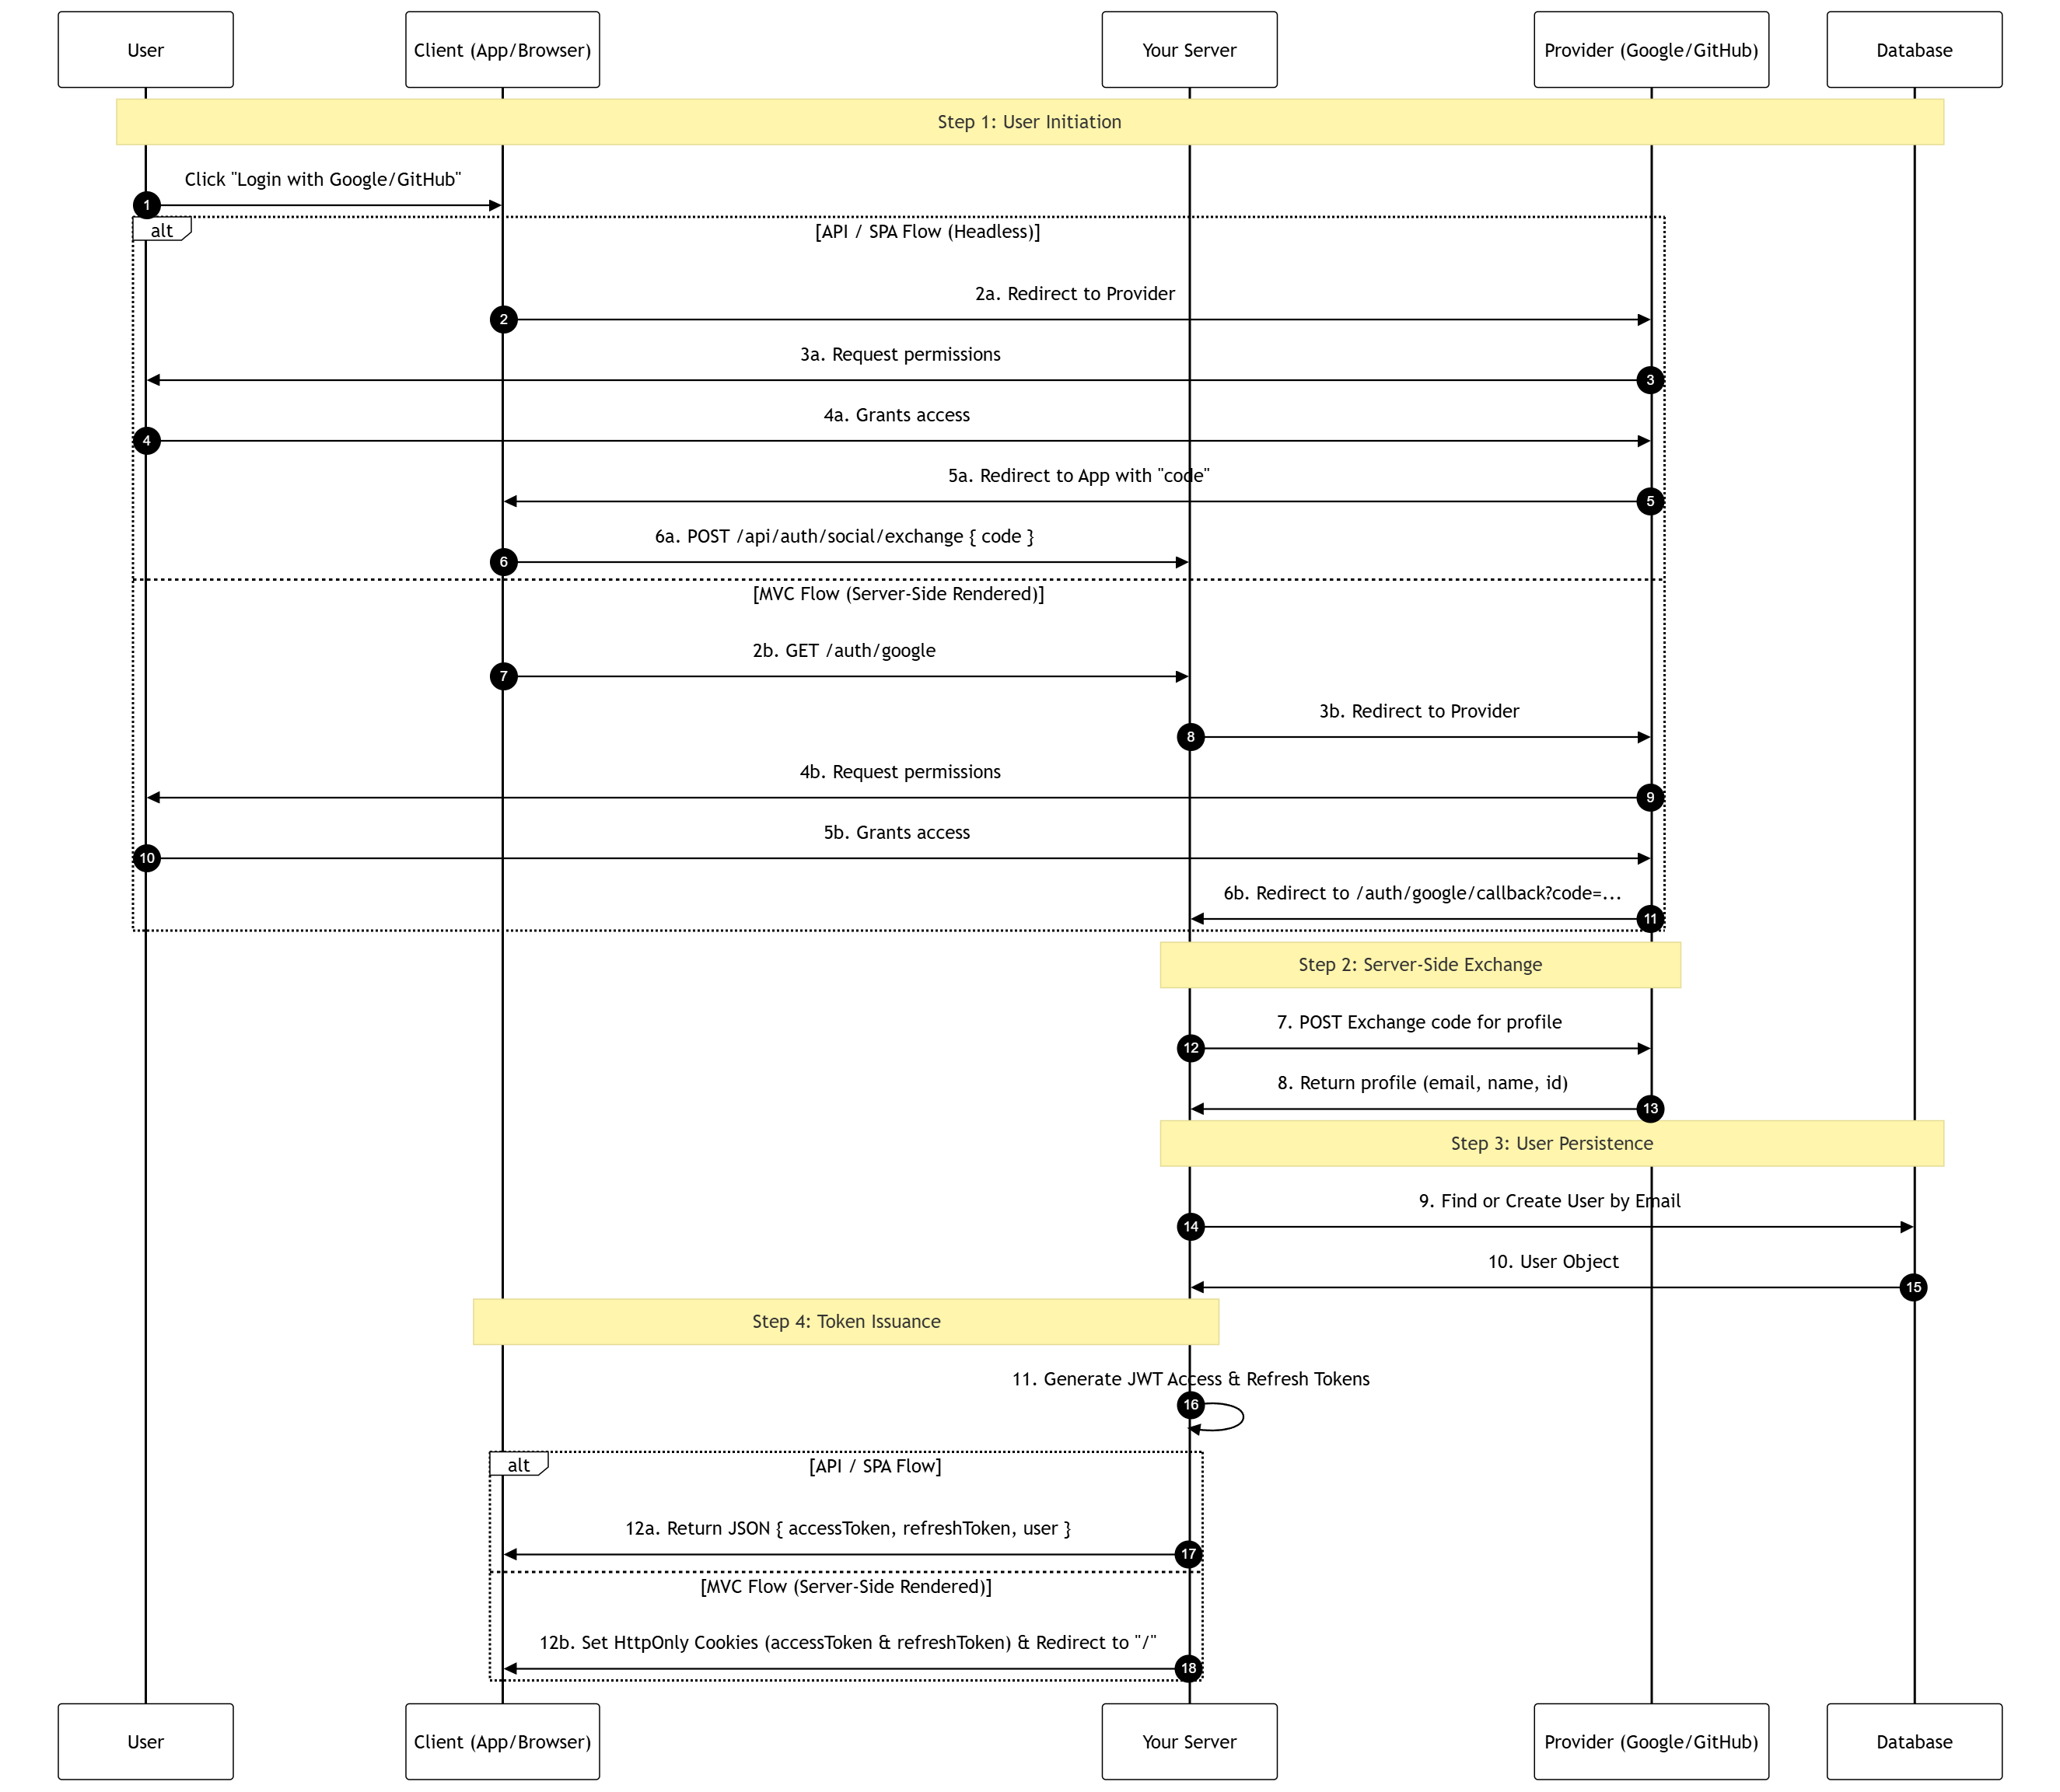
The generator handles the complexity of OAuth2 by providing a seamless, integrated authentication flow.
View Technical Sequence Diagram (Advanced)
Provider Setup Guides
| Provider | Setup Location | Required Redirect URI |
|---|---|---|
| Google Cloud Console | http://localhost:3000/[auth|api/auth]/google/callback | |
| GitHub | GitHub Developer Settings | http://localhost:3000/[auth|api/auth]/github/callback |
TIP
Swagger Testing: The "Execute" button in Swagger UI will return "Failed to fetch" for routes that res.redirect() to Google/GitHub. This is expected browser behavior. To test these routes, paste http://localhost:3000/[auth|api/auth]/google directly into your browser's address bar.
How to Test the Exchange Flow Manually
Testing the POST /auth/social/exchange endpoint (for Mobile/SPAs) requires a real, one-time authorization code.
Construct the Auth URL:
- Google:
https://accounts.google.com/o/oauth2/v2/auth?response_type=code&client_id=YOUR_CLIENT_ID&scope=email%20profile&redirect_uri=http://localhost:3000/[auth|api/auth]/google/callback - GitHub:
https://github.com/login/oauth/authorize?client_id=YOUR_CLIENT_ID&scope=user:email&redirect_uri=http://localhost:3000/[auth|api/auth]/github/callback
- Google:
Capture the Code (The "Stop Server" Trick):
IMPORTANT
Authorization codes are single-use. If your server is running, it will automatically catch the redirect and "consume" the code immediately, making it invalid for Swagger testing.
To capture it manually:
- Stop your server (Ctrl+C).
- Click the Auth URL in your browser and log in.
- Your browser will say "Site can't be reached" (this is good!).
- Copy the code from the address bar (e.g.,
code=4/0Af...). - Start your server (
npm run dev) and proceed to Step 3.
Exchange in Swagger:
- URL Decoding: If your code contains
%2F, replace it with/. - JSON Body: Paste the code into
POST /auth/social/exchange. - Redirect URI: Ensure the
redirectUrimatches the one used in Step 1.
json{ "code": "YOUR_COPIED_CODE", "provider": "Google", "redirectUri": "http://localhost:3000/[auth|api/auth]/google/callback" }- Execute: You will receive your JWT tokens in the response body.
- URL Decoding: If your code contains
CAUTION
Single Use: Authorization codes are single-use. If you use it once in Swagger (or if your browser hits the callback route first), the code will become invalid. You must generate a new code for every test.
Deep Dive into Social Login Security
Want to understand the architecture behind this implementation? We have published two comprehensive security articles on System Weakness (Medium) regarding these exact patterns:
Advanced Security Features
Our implementation includes "Big Tech" security features out of the box.
1. Refresh Token Rotation
Every time a refreshToken is used to get a new accessToken, the old refreshToken is invalidated and a brand new one is issued. This minimizes the window of opportunity for an attacker.
2. Theft Detection
If a leaked refreshToken is reused by an attacker:
- The server detects the reuse of an old
jti(JWT ID). - The system immediately revokes all active sessions for that user.
- The user is forced to log in again, effectively "locking out" the attacker.
3. Token Blacklisting (Logout)
Since JWTs are stateless, they cannot be "deleted" from the client. We solve this by storing the jti of logged-out tokens in Redis with a TTL matching the token's expiration.
POST /api/auth/logout
Authorization: Bearer <accessToken>
{
  "refreshToken": "<refreshToken>"
}
**Deep Dive into JWT Security**
We've covered the complex challenges of scaling JWT stateless security and how our Redis blacklist approach solves them. Read our featured article on System Weakness:
Architecture & File Map
| Component | Responsibility | MVC Location | Clean Architecture Location |
|---|---|---|---|
| JwtService | Token logic & Blacklist checks. | src/services/jwtService.ts | src/infrastructure/auth/jwtService.ts |
| SocialAuthService | OAuth2 profile exchange providers. | src/services/socialAuthService.ts | src/infrastructure/auth/socialAuthService.ts |
| SocialLoginUseCase | Business logic for social auth. | N/A (in Controller) | src/usecases/auth/socialLoginUseCase.ts |
| AuthMiddleware | JWT & Blacklist interception. | src/middleware/authMiddleware.ts | src/infrastructure/webserver/middleware/authMiddleware.ts |
| AuthController | Request orchestration. | src/controllers/authController.ts | src/interfaces/controllers/auth/authController.ts |
Clean Architecture Support
For enterprise applications, the generator scaffolds the Auth module using strict architectural boundaries:
- Infrastructure Layer: Implements the
ISocialProviderinterface for Google and GitHub. This follows the Open/Closed Principle, making it easy to add new providers (Facebook, Apple) without modifying existing logic. - Application Layer: The
socialLoginUseCaseencapsulates the core business logic, ensuring that authentication flow is independent of the web framework or external APIs. - Security Persistence: Even for social users, the system generates unique
jticlaims and tracks sessions in Redis, ensuring the "Nuclear Revoke" feature works across all authentication methods.
TIP
Pro Tip: Use the Postman Collection in docs/postman (if generated) to test these flows easily. Remember to set your environment variables first!